Tutorial
Below is basic tutorial on how to create your own decal bitmaps for use in the
Half-Life multiplayer game using Paint Shop Pro.
If you would like
to read Valve's
information on decals included in the Half-Life
README file, please do so.
Making a Decal
This tutorial uses Paint Shop Pro.
- Open Paint Shop Pro.
- Open Image File.
- Crop the Image.
- Make the Image Square.
- Convert the Image to Greyscale.
- Resize the Image.
- Invert the Image Colors.
- Save the Image as a Bitmap.
-
-
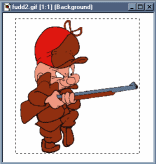
 Your original image
-
Initially, you will need to crop your image. Since the decal must be small (64x64 pixels),
you will probably want to minimize the amount of the white space around your image.
The closer you can get to having the image fill the square, the larger it will be.
- With the selection
 tool, select the part
of the image you would like to use, excluding as much whitespace as possible.
tool, select the part
of the image you would like to use, excluding as much whitespace as possible.
 Selecting the crop area
- Press
[SHIFT-R] to crop the image. This procedure can also
be performed by using the cropping  tool to
select the image and double-clicking on the selected area.
tool to
select the image and double-clicking on the selected area.
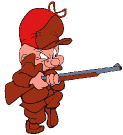 Cropped image
-
Since the decal must be 64x64, you will need the image to be square. To make the image
square, you will need to make sure the dimensions are equal.
- You can view the image dimensions by selecting
View|Image Information from the menu bar or
by pressing [SHIFT-I].
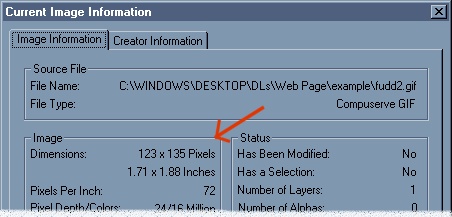 Determining image size through the Image Information
dialog
Determining image size through the Image Information
dialog
- Match the dimensions by selecting
Image|Add Borders
from the menu bar. The dimensions are displayed width by height
in pixels. Our goal is to increase the smaller dimension to match the larger.
In this example, the image is 123 x 135 pixels. Therefore, the image
is 12 pixels taller than it is wide. To add 12 pixels to the width, we will add
6 pixels to both the right and left sides of the image. If the difference between
the dimensions is not divisible by two, add the extra pixel to whichever side
looks better. If the palette background color is not set to the image background
color, you will need to fill in the edges using the fill
 tool.
tool.
 |
|
 |
Original w/ mismatched
border color |
|
Borders corrected with
Fill tool |
Note: If the background of your image is not a solid color (e.g.
a pattern or texture) you may either want to touch it up w/ Paint Shop tools
such as the clone brush, or you may simply want to crop the selection square to begin with.
-
Next, we will need to convert the image to greyscale. In Paint Shop Pro,
images can only be resampled (resized) if the palette is true color (24-bit)
or greyscale. If the image is true color (e.g. a JPEG) you may resize the image (see the next
step) before converting it to greyscale.
The trouble with greyscale is that the image may lose some of its contrast. For simple
two-color line drawings, this probably will not be a problem. But for an image with
multiple shades, you may want to make some adjustments.
Also, you will need to make sure the image background is white once the greyscale
is applied if you don't want a square of paint around your decal when you use it. If the
background isn't too dark, you can use the brightness/contrast control to lighten it, as explained below.
- To start, select
Color|Grey Scale from the menu bar.
The grayscaled image is a fairly good representation of what your decal will
look like in Half-Life.
If the grayscaled image looks acceptable, you may not have to make any adjustments.
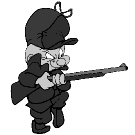 Image converted to greyscale
If the image is darker or blander than it should be, you can try to improve it by
adjusting the contrast and brightness.
- It is a good idea to undo the greyscale before adjusting the image. Select
Edit|Undo from the menu bar or press
[CTRL-Z] to undo.
- Select
Colors|Adjust|Brightness/Contrast
or press [SHIFT-B] to bring up the Brightness/Contrast
dialogue box.
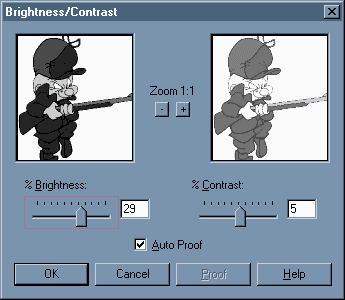 Improving detail with the
Brightness/Contrast dialog
Improving detail with the
Brightness/Contrast dialog
- Increase the brightness and contrast to improve the definition of lines and shading. The proof box will display the effects of the adjustments made.
If lines start to break up or blend in to the background, or any other loss of definition occurs, you will need to decrease your adjustments (usually contrast) until the image is clear. Press OK when you are satisfied with the results.
- Reapply the greyscale to see if the adjustments have helped. If not, try to readjust the settings until the balance is right.
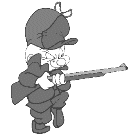 Image with corrected contrast
Of course, some images may look bad in greyscale despite any adjustments. You may want
to try other approaches, such as using the fill or color-replacement tool to introduce a better contrast of colors, or tracing lines with the paint brush tool to thicken them.
-
We made the image square so it wouldn't become distorted when it was resized. Now we resize the image to 64x64 pixels.
In Paint Shop Pro, this operation is called resampling.
- Select
Image|Resize from the menu bar
or press [SHIFT-S]
to bring up the Resize dialogue box.
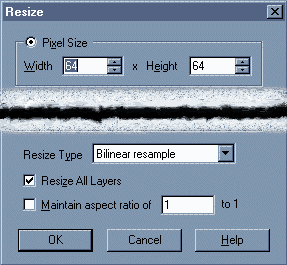 Using the Resize Dialog
- Select the Pixel Size option and type "64" in both the Width and Height fields.
- For the Resize Type option, indicate Smart Size or Bilinear Resample. These methods tend to produce smoother images.
- If the "Maintain Aspect Ratio . . ." box is checked, the image must be square in order to resize to 64 x64. If the image is not square, uncheck the box and the image will be resized with some distortion.
- Press OK when you are finished.
 Image resized to 64x64 pixels
-
When you use decals in Half-Life, the
white areas of the image will be the most pronounced, while the black parts will not show up.
That is, the intensity of the decal in the game is based on how light it is in the image file. For this reason, we will need to invert the image colors.
- Simply Choose
Colors|Negative Image from the menu bar. Your
image will become inverted, like a negative from a photograph (imagine that!).
- If you skipped the greyscale part before resizing, you will need to convert the
image to greyscale now (explained in
step 5). It shouldn't matter whether you greyscale the image before inverting it or after.
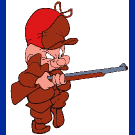
 Final image
(after inverting colors)
You may decide that your decal looks better without being inverted. That's perfectly OK; just remember that the way the image file looks now is not how it appears in the game.
-
You have finished making your decal image! The decal must be saved as a Windows bitmap
before it can be used.
- To do this, select
File|Save As... from the menu
bar or press [F12]. When the Save As... dialogue box comes up,
select "Windows or OS/2 Bitmap (*.bmp)" in the Save As Type field.
Enter the name of your decal and press save.
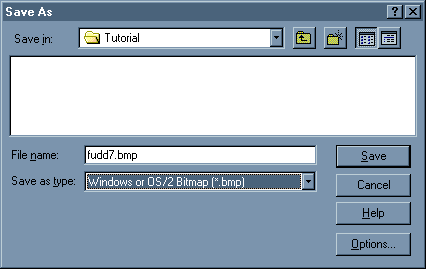 Saving the image as a bitmap
That's it! You're finished. Now put your decal to use. For instructions on how to use
your decal, refer back to the tips page.
Contacting Me
If you have a question or are having difficulties, feel free to contact me at
decalbazaar@rattlebrain.com. I cannot guarantee
that I will reply, but I will try to respond as much as possible. If you would
like to submit a decal you have created, please read how to on the
submissions page.


